This post may contain affiliate links. Please read our disclosure policy.
The best homemade hummus recipe you can make or eat is here! Follow my simple recipe for how to make smooth, excellent homemade hummus using just a few ingredients and tips to get there.
The best homemade hummus recipes are easy, with just a few simple ingredients. But to get truly great, creamy, smooth hummus takes a little something extra in the treatment of the chickpeas.
Hummus is an essential Middle Eastern dish that is part of “mezze” or small plates for appetizers or noshing. Once you make my easy hummus recipe, the store-bought versions will become a thing of the past. Or at least a less frequent appearance!
Keep in mind that authentic hummus always includes chickpeas. “Hummus” is the Arabic word for “chickpeas,” so chickpeas are the most important ingredient. Whenever hummus does not include chickpeas, it may be a delicious dip, but it is not authentic hummus!
Read on for all of the tips and info you need, and watch my quick video tutorial:
Hummus Ingredients
Chickpeas. You can use canned or dry chickpeas. Canned chickpeas should be drained and rinsed, while dry chickpeas must be soaked overnight before they’re drained and simmered for a couple of hours until tender. The key to excellent hummus is to peel the chickpeas! You can also substitute chickpeas with cannellini beans or black beans.
Tahini. Use high-quality tahini to avoid bitter hummus. I recommend Soom, Al Wadi, and Lebanon Valley Tahini. Shake the jar occasionally to keep it from separating. Your tahini will last more than a year in the pantry.
Fresh Lemon Juice. It’s important to use freshly squeezed lemon juice. Instead of lemon juice, use a small amount of rice vinegar, but not as much vinegar as lemon juice.
Garlic Cloves. Fresh, hard heads of garlic are best. Squeeze the head and watch for any hollow or soft sections. If it’s sprouting, cut the clove in half lengthwise and pull the green sprout out to avoid raw garlic burn. Try granulated garlic or roasted garlic instead of fresh garlic.
Chickpea Cooking Liquid or Water. Hummus needs some loosening up with a bit of liquid. If you are cooking chickpeas from dry, save some of the chickpea cooking liquid. If your chickpeas are canned, some of the canned liquid (aquafaba) works well. Water is also a fine option, though it won’t add the same body and flavor as the chickpea liquid. Either should be cold and add it sparingly so your hummus is thick enough to make a well in the center with the back of a spoon.
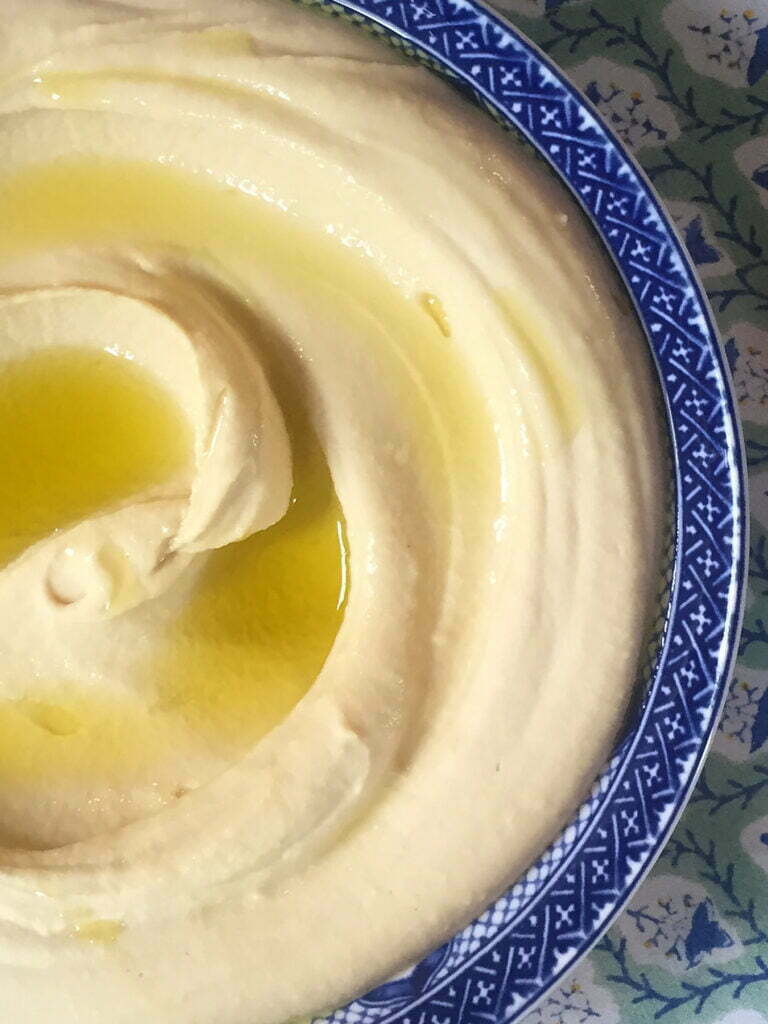
Extra Virgin Olive Oil. To drizzle over the top of the hummus, not blend into the mix. This keeps it light and easy. We love Lebanese Extra Virgin Olive Oil.
Kosher Salt. A dash or two of salt is of course a must; add a little, then taste, and then add more if needed.
Sumac Spice or paprika sprinkled on top makes an authentic look with bright flavor. Other garnishes that adore hummus are sesame seeds, ground cumin, and fresh parsley.
How to make Hummus
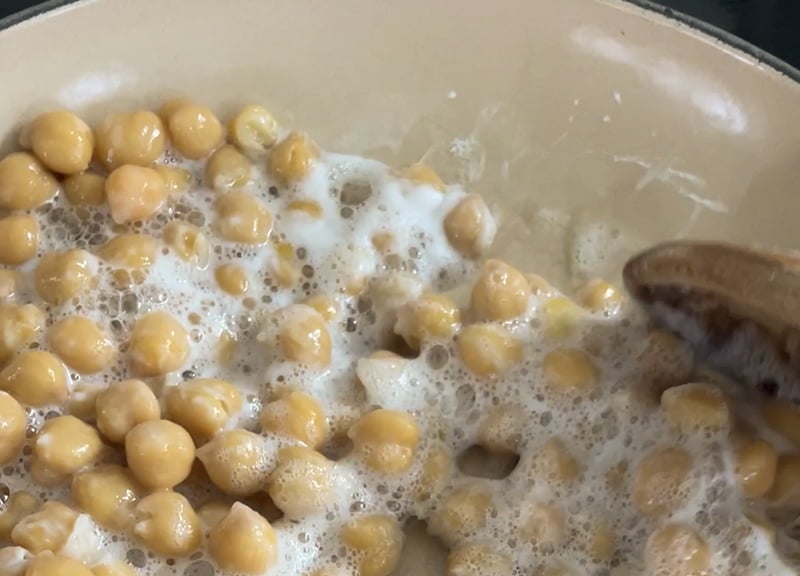
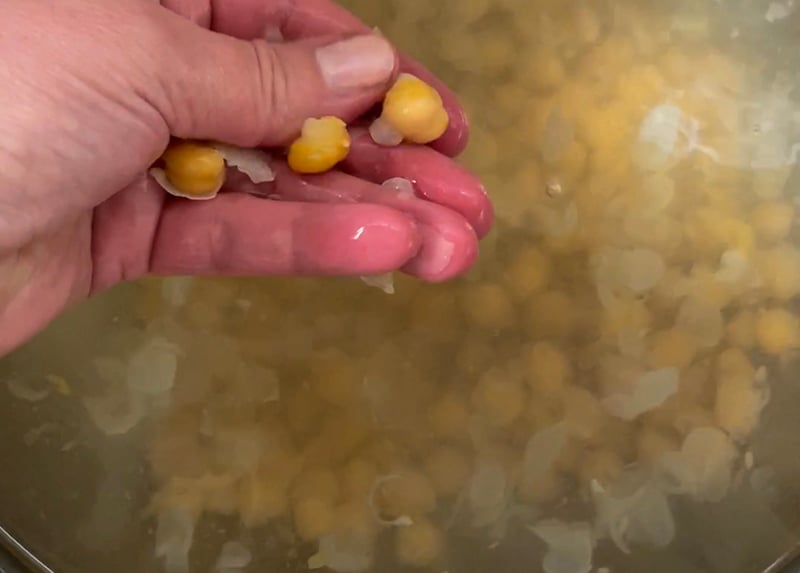
Step 1: Prepare the Chickpeas. Start with canned or dry chickpeas. For canned, drain and rinse. For dry, soak overnight, then drain and simmer in lots of water for a couple of hours until tender. Warm the chickpeas in a sauté pan with a tablespoon of baking soda. Then immerse the chickpeas in a huge bowl of water in the sink. Agitate, popping the skins off every chickpea you can grab. Pour off the water with the skins. Repeat, and repeat. Know too that there’s another option here, what I call Smooth Hummus Chickpeas in my shop! The skins are off, so the chickpea need only be simmered until tender for about 90 minutes.
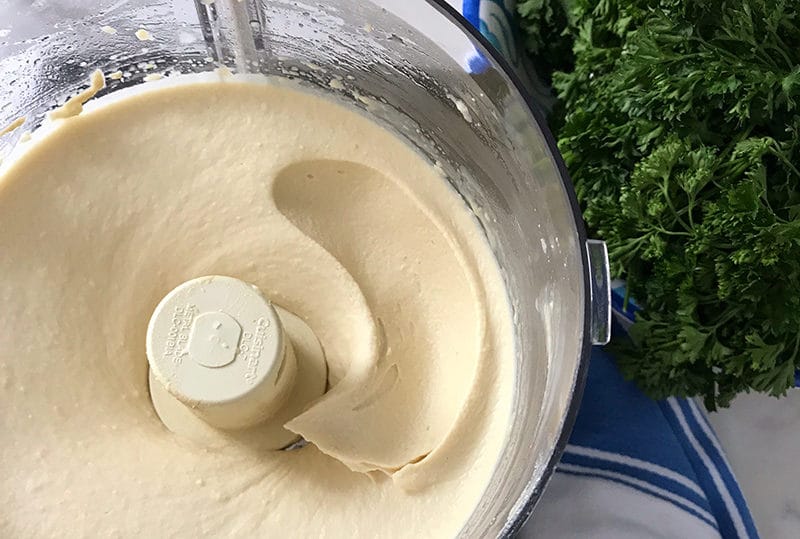
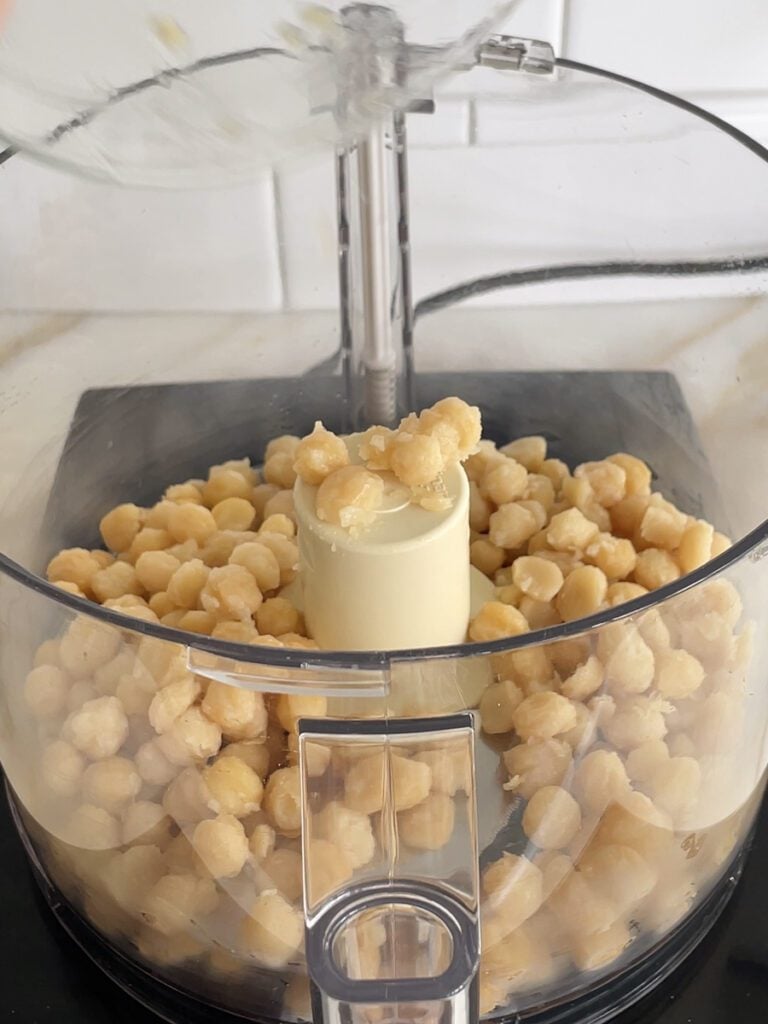
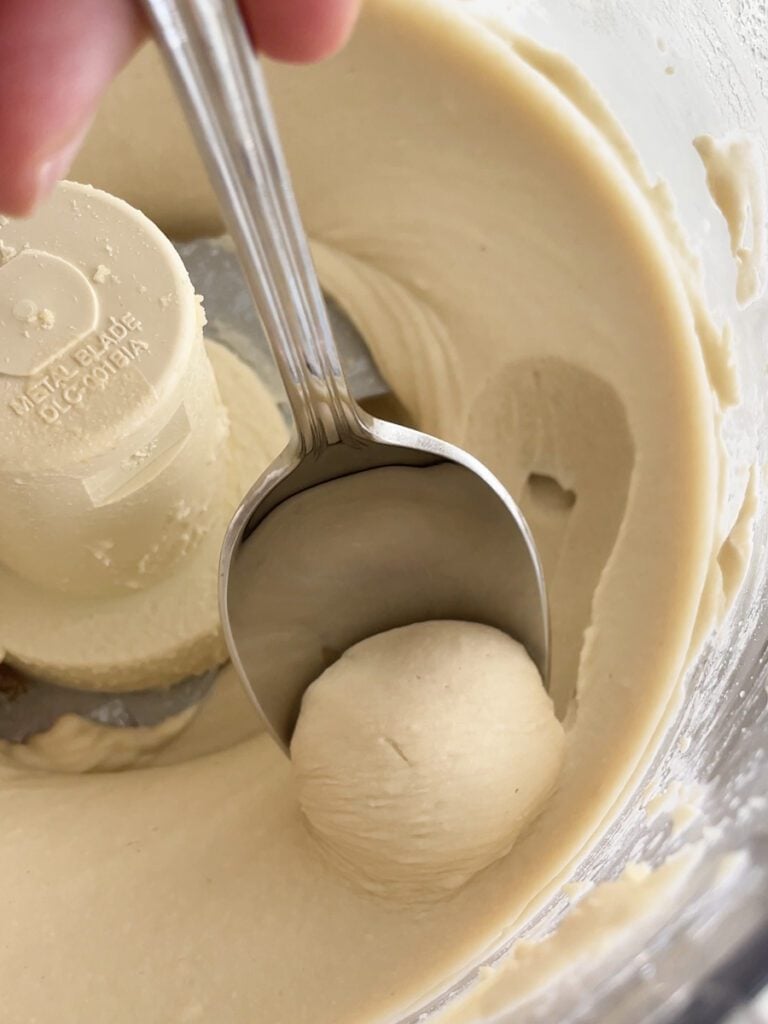
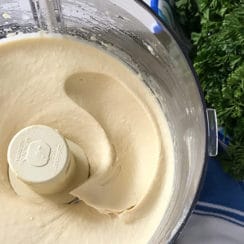
Step 2: Process the ingredients. Add the chickpeas and garlic to a food processor, and process them until they are pulverized. Although a blender would work in a pinch, the blades on a food processor are wide and make for a smooth and lush hummus. The blender requires more stopping and scraping down as you go, to keep everything near the blades.
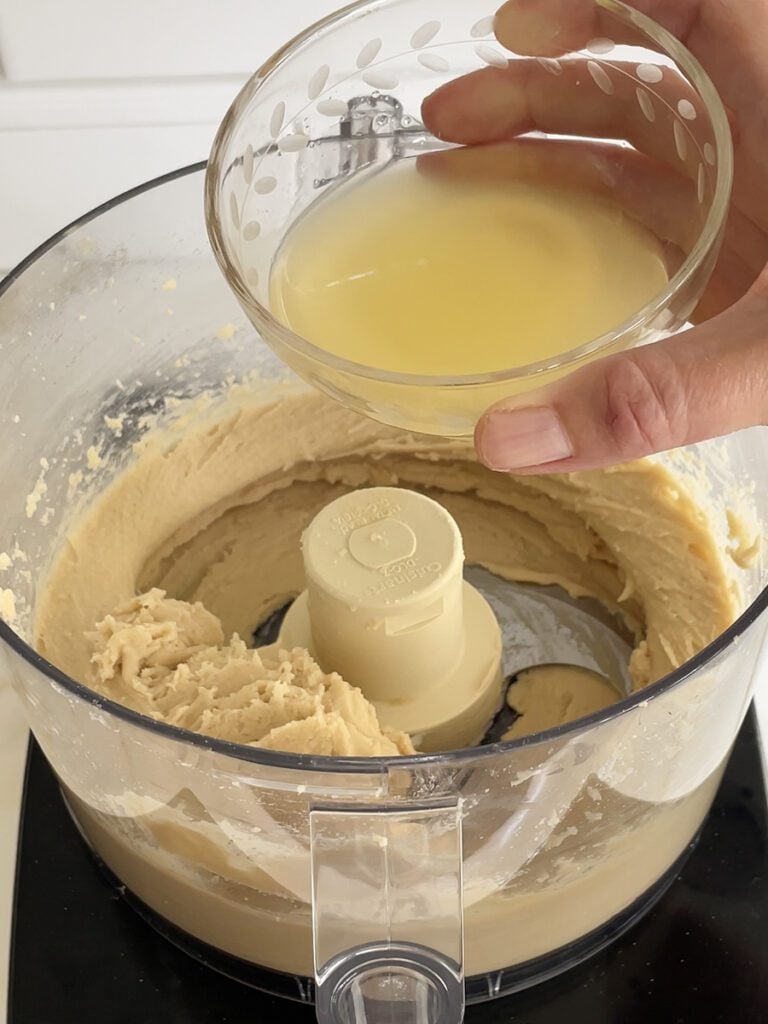
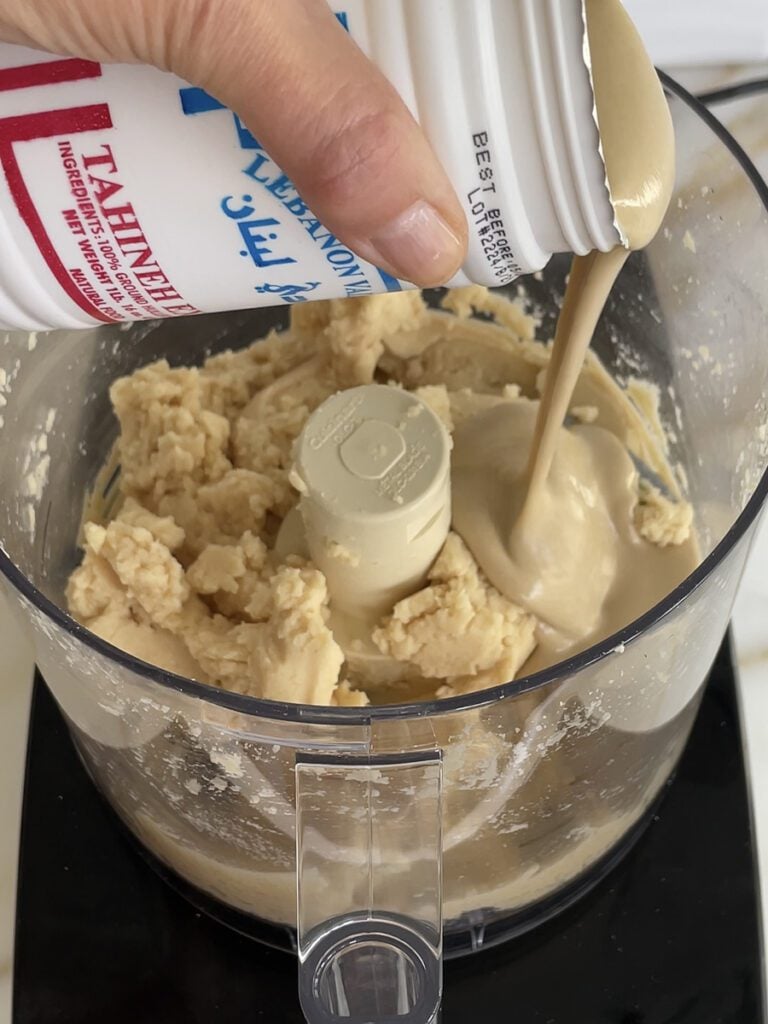
Step 3: Add seasoning and liquids. Add the salt, lemon juice, tahini, and a touch of cold cooking liquid or cold water. Add the liquid slowly so as not to make it too thin.
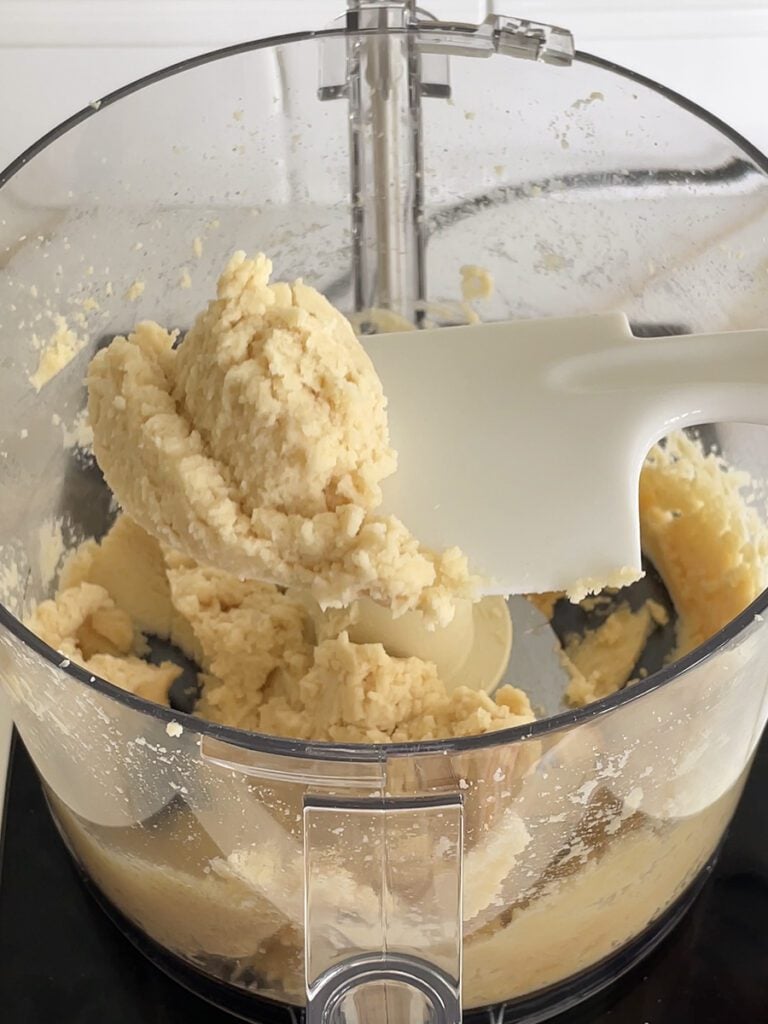
Step 4: Stop and scrape it all down. Stop the food processor frequently and scrape down the sides of the bowl. You’ll get any little pieces of chickpea or garlic blended in this way. If you wait until the end to scrape down the bowl, your gorgeous smooth texture will get grainy from the pieces that weren’t blended in earlier.
Step 5: Adjust. Taste and see if you’d like it thinner or lighter. If so, slowly add cold cooking liquid or water, a tablespoon at a time until the texture is to your liking. Make sure it is thick enough to spoon up and hold its shape.
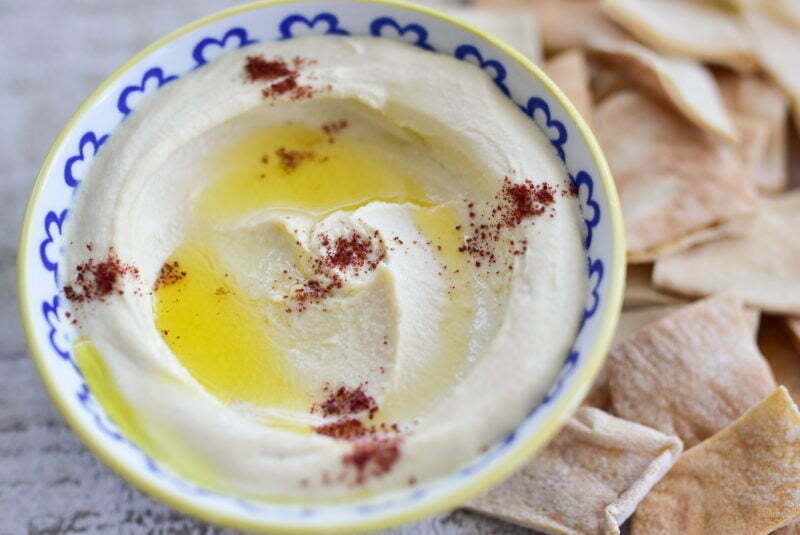
You can serve immediately with a drizzle of olive oil and a sprinkle of sumac, or top it with some spicy red peppers.

Storing Leftovers
Storing: Put any leftovers into an airtight container and keep it in the refrigerator for up to 1 week. To serve, bring to room temperature and stir or whisk with a touch of lemon juice or water, if needed, to help smooth it out.
Hummus is not suitable for freezing because it can dry out and generally lose its texture. It also doesn’t maintain fresh flavor. I highly recommend making a fresh batch and storing it in the fridge.
FAQ and Tips for Making the Best Hummus
First, make sure your basic ingredients are all high quality. Then, have fun playing with add-ins! Add red bell pepper or roasted red bell pepper right in the mix while processing (add with the tahini), or pile sautéed peppers on top when serving. Try roasted garlic rather than fresh. Ground cumin adds another flavor profile, as does Lebanese 7 Spice (baharat) and finishing with fresh parsley or other herbs and/or toasted sesame seeds.
My favorite question! Hummus is the Arabic word for chickpea, so chickpeas make hummus hummus. The other ingredients may vary, but chickpeas are a must to make authentic hummus.
This is a food with so many nutritional qualities that it can be part of a daily diet, high in fiber and plant protein. Plus it is such a versatile food, with so many ways to eat it: as a dip for veggies or pita chips, as a spread on sandwiches, burgers, and wraps, as a base in a bowl with other ingredients (try it with my Tabbouleh salad recipe).
Hummus with no tahini is so do-able! Just leave the tahini sesame paste out of the recipe and add more liquid (chickpea cooking liquid, canned chickpea liquid, or cold water–which you can chill quickly with ice cubes) as needed to make it smooth and creamy.
The best way to make it thicker is to add it to another, thicker batch. You can add more chickpeas and process the mixture; the end result won’t be as smooth and creamy as when you process the chickpeas without other ingredients as the first step, but the dip will be thicker.
Hummus has been around a lot longer than the food processor, so yes, it can be made by hand. The chickpeas must be mashed using a mortar and pestle or potato masher, or the tines of a fork. Stir in the other ingredients. The end result will be a thicker, grainy texture but a delicious dip to devour!
More hummus recipes to try
If you love the fresh flavors of mint and basil, you have to try my fresh herb hummus. The green color of the herbs is also beautiful!
My avocado hummus recipe is another pretty green one. Between the peeled chickpeas and the creamy avocado, the texture is magical.
Red beet hummus is another colorful one. The beets add a beautiful pink hue. You can use roasted, canned, jarred, or even pickled beets for this recipe.
If you need more hummus recommendations, here’s a list of all of my favorite Lebanese hummus recipes. Or, if you’ve already tried all my hummus recipes and need something new, try my whipped feta dip instead!
Authentic Homemade Hummus Recipe
Ingredients
- 2 cups cooked skinless chickpeas (they take about 2 hours to cook properly from dry)
- 1 clove garlic, green sprout removed and minced
- ½ cup tahini, well-stirred before measuring
- ½ teaspoon kosher salt
- Juice of 1 lemon
- Chickpea cooking liquid, or cold water, as needed
- Extra virgin olive oil, for finishing
- Sumac, for finishing
Instructions
- In the bowl of a food processor, puree the chickpeas and garlic until a thick paste forms. Stop and scrape down the bowl, then process a couple of minutes longer, to get the chickpeas very well pureed.
- Add the tahini, salt, and lemon juice and process until well-blended. Taste and see if you'd like the hummus thinner or lighter. If so, Slowly add cold cooking liquid or water, a tablespoon at a time, until the hummus is very smooth and light but thick enough to spoon up and hold its shape.
- Spoon the hummus onto salad plate or bowl, spreading the hummus with the back of a spoon to form a well in the center. Drizzle with olive oil and sprinkle with sumac, and serve immediately.
Notes
Nutrition
Nutrition information is automatically calculated, so should only be used as an approximation.


I’ve only started making hummus from dried chickpeas. I have yet to achieve the smooth texture seen in your picture. I have a Hamilton Beach processor and maybe it isn’t sufficient. I never did achieve a “paste” with the first step with the chickpeas and garlic. It was very dry. So I moved in to adding the liquids. Once finished, I put a portion in my mini processor….a KitchenAid and did get a smoother texture there but not the silk like texture I was looking for. However . . . . this is the best tasting hummus I have ever made! Or tasted. I will keep trying. And yes I attempted to dehusk all the chickpea shells.
Hi Marcy, I’m so glad you are making hummus. Blenders don’t have as much blade surface as food processors to, so that can result in chunkier, grainier hummus. Try using warmed chickpeas to start and see if that helps them break down better. The removal of the peel is key and I’m glad you’re doing that! You can get the chickpeas already peeled in my online shop as well, makes it faster/easier!!
Your lesson on cooking and skinning the chickpeas has been invaluable to making the yummiest hummus. Many thanks. By the way, I see in the NY Times you’re collaborating with one of my favorites, Melissa Clarke. Thrilled to watch what you two create.
Thanks so very much Kate! Great to connect with you!
I’ve read basically everything there is to read online about hummus, and this is one of the better overviews. Here are two other tricks for getting the skins off if you can’t buy the pre-skinned ones for whatever reason (great idea for a product, by the way):
1. Chana dal (split chickpeas). These come split in half and therefore skinned. Apparently, the chickpeas are of a smaller type and they’re used in Indian cooking. However, they cook fast and sure are convenient for making hummus. I don’t know why they aren’t more popular.
2. Saute in baking soda on medium heat for a few min, boil for just 10 min or so (in the baking soda), then remove from the heat, rinse, and squeeze them, which cracks them in half and makes split chickpeas. Do this under running water and the skins come right off. This technique isn’t much different from what the author mentioned, albeit a bit more aggressive.
Can the skinned chickpeas be cooked in a pressure cooker?
Hi Amy–you can do this but the chickpeas really break down under pressure. Just take care not to overcook. I do prefer stovetop!
Thank you for this great “hack”! Peeling the skins definitely makes a difference. If I’m in a hurry, I’d love to make this with canned chickpeas. Would you still use two cups cooked if using canned chickpeas?
Roupen, you can absolutely substituted canned chickpeas and you can skin them in a big bowl of water, rinsed repeatedly. First warm the drained chickpeas in a skillet with a couple of teaspoons of baking soda. Yes, two cups of canned chickpeas.
Hi Maureen. Love your explanations. This sounds wonderful and I will make it next time. I wondered what the baking soda does when warming in the skillet? Does it change the texture or the flavor? Do you rinse it off?
Thank you Robin! The baking soda helps break down those pesky skins and makes them slide off more easily. There’s a lot of rinsing so the baking soda is rinsed away, no residual flavor.
Wow! I’ve just made this and it’s without a doubt the best hummus I have ever made! No oil in the mix or yoghurt to thin it. Followed your quantities to the letter apart from subbing ice cubes for water. (Saw the ice cube thing on another blog) Totally worth removing the skins. It’s absolutely delicious and so smooth!
Amanda, this is so great! Thanks for sharing!
Ugh, wish I had a happier comment! I got some rather strong garlic cloves and dang it if by just trying it…my stomach is killing me! Seems like I could soften the flavor out with the lemon juice and tahini…but no. It will keep any vampires within a mile or 2 from our house! The hummus is for tomorrow’s dinner…can u think of a way to save 4 bags of cooked chi chi beans made into garlic hummus? Ps. Our family is vegan so that yogurt I thought about won’t work bcuz I don’t have any! Thank u for any ideas! Help! Lol
Nancy, sorry I didn’t get to you before your dinner! Too much garlic is tough to counter without something like yogurt, but even then you’ll get a lot of the strong garlic flavor. Other ingredients to add to disperse the garlic flavor: cooked beet, or roasted red bell pepper. The best way to fix this is to puree more chickpeas and tahini, adding your prior garlicky batch, or just some of it, to the new. It sounds like I’m saying you have to start over and kind of, you do!!
I made this with white beans instead of chickpeas and added a little fresh turmeric. I added a lot more lemon juice. Ate with raw carrot and red bell pepper. Very good!
Nice!
Being lazy…. I mix the Hummus components in the reverse order. First, in a fast food processor, I make a tahini sauce (Garlic, cold water, lemon) to the thickness I like, than, I take 2/3 of the quantity out for making other dips. I add the peeled and cooked garbonzo beens and blend to a smooth past. pour the Hummus to a container, get another 1/3 of the prepared tahini sauce, mix it with parsley and mire minced garlic (must taste the garlic) and save it as Tahini dip. The third 1/3 is mixed with the inside of a roasted eggplant, added (but not too much) lemon and garlic to taste and mixed lightly to make “Baba Gamush… So here you are: three dips for the short cut cooking lover. cooking time 15 minutes, excluding the poiling and peeling of garbonzos as well as eggplant roasting time. …and if you are told it’s great with Pita bread, one may ask what Pita bread…. I know of at least a dozen different types and choosing one is really a matter of personal preferenceI My advise to skip a Pita bread that crumbles in your hands.
Well to me that’s not lazy, it’s brilliant! Thank you for sharing!
Hi Maureen,
Do you also sell peeled chickpeas in bulk? Please provide info and pricing.
Thank you.
Dimitri
Is there a brand of canned chickpeas you recommend if cooking even the skinless chickpeas is too much to do?
Hi! Look for all-natural or organic chickpeas. I often purchase the grocery store private label natural chickpeas for salads and other dishes and they are fine.
Tried your hummus, pita chips, and mint lemonade recipes. Awesome! Delish to the max. I will be giving many more of your recipes a try for sure. I’m only cooking for one so am sharing all your goodies. Wonderful that your keeping the authentic dishes alive. Happy I stumbled across your recipes. Shukraan from Montreal.
We have just made your recipe hoping it’s as good as Ishibelli restaurant in London. It is fabulous but I made the mistake of putting too much garlic in. I have more chickpeas, cooked with some of the liquid. Do you recommend I add more to reduce some of the strong garlic taste or would a little yogurt work best.
Hi Iris–I think adding more chickpeas would even out the flavor of the garlic, but you may not be able to get them as smooth as the initial batch. Adding yogurt is a good idea too! Either way, adding ingredients like these will help to further distribute the flavor of the garlic, and reduce it.
Hi Maureen, I’m a fan! Question: do you measure the tahini in a liquid or dry measuring cup? I’ve always used closer to a 1:1 ratio (with more on the chickpea side), as I learned from an Israeli Chef (no, not THAT one ) . It’s delicious and creamy, but I’d like to toy around with other handed-down-now-updated recipes from hummus’ first origin, which I understand is Arabic, more specifically Palestine/Lebanon. Shukran!
Measure tahini in a liquid measure…but I have to say I just pour it in, a good healthy glug of it, approximating the amount that I like based on past batches (I like a good amount when the tahini is excellent, like the one we offer at Maureen Abood Market.) Enjoy Lebanese hummus, and thank you!
Hi, I also use pressure cooker… depending on the actual pressure you use,and size of it, , usually takes about 5-6 mins cooking…. I cover them with water, 1inch above surface of (pre-soaked over night chickpeas)with a change of water next day,(use boiled water to steam them in p.cooker on full , If I see they are not quite as soft as needed for hummus, after that time , I steam them maybe 1minute or more. Actually , cooking times,depend on the quality, and size of chick peas,also whether they are whole chickpeas or halved … hope that helps
i have always cooked my chickpeas in pressure cooker. Can you estimate how much time it would take to cook your already peeled chickpeas, which I have waiting to be cooked?
Thanks
Hi Ina–I have not tried the skinless chickpeas in a pressure cooker! The ones I sell are parcooked, so no long soak–it takes a full two hours on the stove so you may be able to estimate from that based on other things you’ve cooked with pressure.
Very nice post! Thank you so much!
I never realized making your own hummus was so simple! It’s probably way better than the store-bought stuff too 🙂
My Paternal Grandmother was Abood, immigrated to Texas as a 12 year old in 1880. Wonder if we are kin?
Certainly possible! No one in our family started out in Texas, but they may have been from the same village? Dier Mimas.
Hi Maureen, do you have any experience making hummus using desi chicpeas? My local grocery store started carrying these and I noticed the skin is already removed, but not sure if these are appropriate for hummus?
I have tried them and found the flavor not quite the same, but you may want to give it a whirl!
One person commented that she had a problem with solidified tahini. When I get a new jar of tahini it is often separated with the oil on top and the sesame paste solidified on the bottom. I put the whole thing in the food processor and blend it for a few minutes until smooth, then pour it back in the jar. After that, all it needs is an occasional shake or stir to keep it from separating again. Whenever I make your hummus recipe I have to decorate it with three whole chick peas (always three) and paprika on top or my husband won’t eat it. I have discovered that there are unwritten rules about how Lebanese food needs to be decorated or presented to make the dish truly authentic.
I do the same thing with a new jar or can of tahini! And I do it just before making a batch of hummus, so the residue of tahini in the processor bowl gets incorporated into the hummus. I also put the now-homogenized tahini into the fridge so that it does not separate.
Love that Anne, thank you!
Thanks Maureen!
My son is a fan of hummus, he prepares big batches every week.
I´m sure he will try your recipe.
I wish you a wonderful 2016
Madrid, Spain 1/1/2016
Wonderful!
Thank you for the best hummus recipe Maureen. I always make hummus and today I followed your recipe step by step & my husband said it’s so delicious what did you do differently & I told him it’s yours.
Recently I made so many recipes from your book & they all turn out great successes. The tabouli with avocado, most of the salads, the leg of lamb, 2 chicken recipes one from your blog ( your mom’s baked fried chicken), potatoes with za’atar, eggs with za’atar. The dark chocolate cake with raspberry. I’m enjoying cooking a lot because of your beautiful & easy recipes. Thanks again.
What a lovely website. Your recipes looks so delectable and I’m sure to try them as my kids prefer Lebanese over our ethnic food from India and Pakistan!
Thank you so much Asma!
Love your recipes! I went to the Lebanese festival, this past May, In Virginia and the food was delicious! We had a small family reunion, as we are of Lebanese descent, however, our grandparents and parents have passed on, and recipes lost. We all bought cookbooks, and most of the recipes were very confusing, as we are ALL Americanized. I sent everyone the name of your website, through email, and told them to refer to your recipes .
With that being said, I just wanted to thank you for your dedication to the Lebanese cuisine, and keeping it True! We so appreciate your recipes. I love that you always keep it authentic, and then maybe add your own spin.
How wonderful Tara, thank you!
The simplest and easiest to make recipe I’ve stumbled upon. Thanks for the hummus guide, Maureen!
Thanks Amber!
You keep tahini for as long as a year? Mine lasts only a month. Before I need another jar 😉
Thanks for your blog. From a middle aged man in England who was vegetarian for 34 years until I became vegan this year. By exploring dishes from what I call the Mediterranean rim and the Middle East, I don’t miss dairy at all.
Wonderful Stephen! Lebanese recipes are perfect for the vegan diet, and I can see why you plow through your tahini! Sounds like you found a delicious one to use too, which is great.
Dear Maureen;
I love to make homemade Baba Ghanooj and Hummus Bi Tahini. I always buy the smallest jar of the Tahini. However I am unable to use the entire portion at once. If I leave some Tahini in the jar, it solidifies after a few days. I tried warming the Tahini in a hot water bath to loosen it. No luck. I end up throwing the remainder away and buying a new jar.
Do you a method for how to keep the Tahini from not solidifying? Help is always appreciated.
Hi Anis–sounds like the tahini you’re getting is already somewhat solidified, and it’s tough to reverse that. My tahini is smooth fresh, and I keep it that way by shaking the jar regularly as it sits (at cool room temp).
I love hummus but my body does not. Chick peas give me migraines if I eat too many. How about a killer Baba Ganoush recipe? Please, please
Jillian, bummer! But the baba gannouj is right here waiting for you!
Saw your article in the Washington Post, and now this write up. Both great writing and photography. thank you.
The Post article, which I saved, had a recipe listing ingredients, didn’t see that in the above article.
Am confused a bit though about peeled chick peas vs skinless chick peas, apparently the peeled ones have been treated and de-skinned already?
I also noted your comment about garlic burn and it brought back memories. In La Crosse Wisconsin there used to be a Lebanese restaurant, the former owner and chef still cooks for my brother occasionally. One time my brother and wife spent quite a bit of time peeling garlic cloves and putting them in a container in anticipation of the chef’s making hummus. They also had a store bought rather large unopened container of garlic cloves that had been peeled commercially already. Well this chef is famous for his use of garlic so we begged him to make two batches, one with less garlic. He did. It didn’t matter, both were very strong. I recall him dumping the entire container of garlic in the blender, I think before the other ingredients. In the second batch he used a bit less. For the fun of it I tried the stronger batch, I didn’t know garlic could burn almost like horseradish! But that begs the question Maureen, is one clove really enough! 🙂
Hi Jerry–all standard chickpeas have a thin skin on them. You can remove these yourself (method in my book and the Washington Post piece) or you can buy them already peeled from me! My pre-peeled chickpeas are dried but par-cooked, so they only need about 90 minutes in boiling water. As for the garlic, the hummus is your blank slate…I like one clove for a balanced, luscious flavor with the lemon, tahini, chickpeas, olive oil.
Yumm for hummus.
Nothing better than fresh hummus. Am I mistaken that you used to put a little yogurt in yours?
Hi Bill! I did add yogurt into the mix, before I discovered the role of peeled chickpeas in texture and flavor. Still, the yogurt is a delicious addition!
I must try your chickpeas and the Lebanon Valley tahini! And now that my husband is vegan and has joined me after a few decades, hummus is a staple for us-not just for special occasions.
Good for you two Diane, and I bet hummus is essential for you then! Let me know what you think of the tahini and chickpeas! Warm regards to you two–