This post may contain affiliate links. Please read our disclosure policy.
Oil pie crust is made with neutral oil, flour, water, and a touch of salt. Make divine pie crust using this easy dough recipe, and no butter. This vegan crust is ultra flakey!
Everyone who knew my mother knew that the hallmark of her character was grace. Pure grace. This was reflected in her face, her home, her kitchen, her conversations.
And her pie.
I love watching people taste my mom’s pie for the first time. Always, always (while chewing): what is this crust? Always, always: Mom glowed.
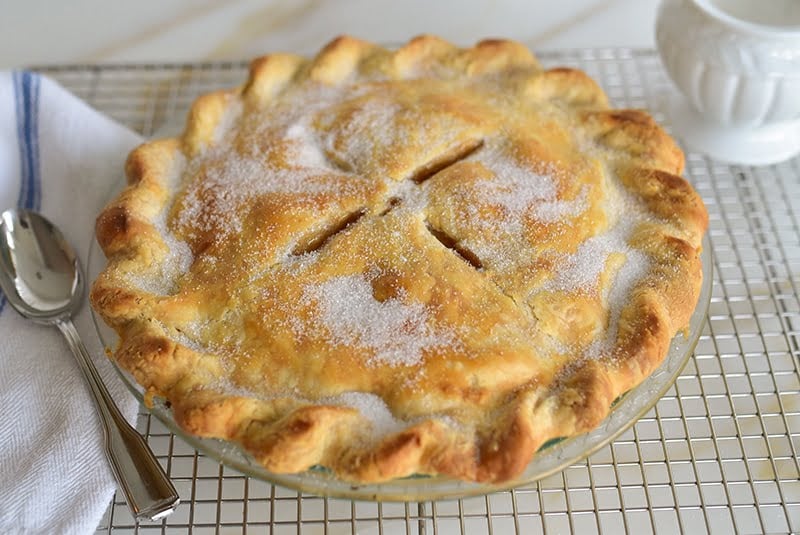
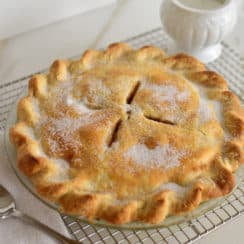
The fillings for my mom’s pies are excellent, traditional, and sturdy. What puts them and any good pie in a class by themselves, though, is the crust, her crust: golden, shattering flakes and absolute readiness to crumble when eaten (and not before). Hint of salt, such a harmony with the sweet fillings. Above all, of course, is the flavor of this crust. Here is supreme taste where there is no butter, and a flavor of toastiness that defines the very notion of deep golden brown. I find that unless it’s my mom’s crust, I tend to leave on the plate whatever crust wasn’t touched by filling. Hers I will eat every crumb off my plate and yours too if you look away for more than a second.
Table of Contents
Why you’ll love oil pie crust
This recipe is a no butter pie crust, flaky, with a hint of salt. The dough makes for the perfect vegan pie crust, and the best part is that it’s sturdy enough to support any filling. It’s easy for first time pie makers, the simple, basic ingredients will make this your go-to recipe.
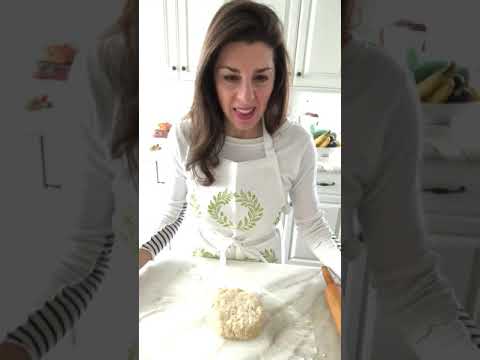
Watch my how-to video!
It’s sort of “rustic,” this video, but still…:
Oil Pie Crust Ingredients
Flour. Unbleached all-purpose flour. Easy as that. Plus a little extra flour if you’re making fruit pies and need to coat the filling so it holds together.
Salt. One teaspoon kosher salt, or half a teaspoon table salt.
Oil. I like vegetable oil or canola oil for this pie recipe. Coconut oil works if that’s what you have on hand!
Ice water. This is crucial. Cold water, in the right amount, will make the dough soft and pliable. Don’t even need to go to the grocery store for this!
Milk. Any kind of milk works, even an alternative like almond milk, on top of the pie before baking to give it that golden brown look. And if you don’t brush milk on top, the crust will be fine, still great!

How to make oil pie crust
Step 1. Mix the ingredients. In a large bowl, mix flour and salt together. Add the oil, except for the extra teaspoon, and stir until the flour mixture is incorporated and a pea-sized meal forms.
Add the cold water one tablespoon at a time, incorporating as you go. The pie dough should be soft and pliable, not cracking and dry. You can add more oil if needed to achieve this consistency, but not water. Divide the ball of dough in half.
Step 2. Roll the dough. Use sheets of wax paper to assist in rolling and transferring the dough to the pie plate. Oil dough does not fold and move the way butter dough does, so the wax paper is essential! Place one of the dough balls in the center of one of the pieces of waxed paper, and shape it into a flat disk. Cover with the other half of wax paper and roll with a rolling pin to 2 inches larger than the pie pan. This will allow the dough to slide down into the pie plate and still cover the rim.
Step 3. Transfer the rolled crust to the pie plate. Remove one side of the wax paper, invert the crust into the pie dish, and slowly, carefully remove the top sheet of wax paper. If necessary, use a sharp knife or pastry cutter to trim excess crust around the perimeter of the pie plate.
Step 4. Fill the pie with your filling. Then, if making a double crust pie, repeat the steps to roll out the top crust, and lay it, centered, over the filling.
How to Crimp and Finish the Pie
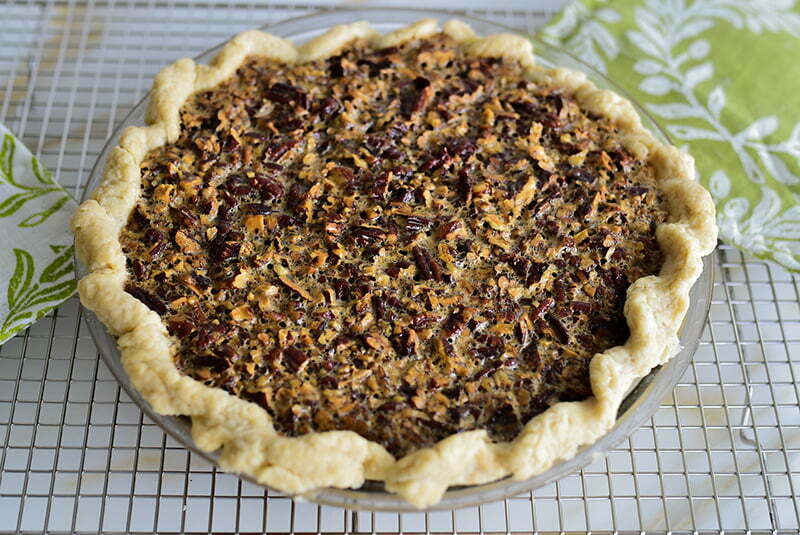
Crimping seals the pie closed on a double crust pie, and makes the decorative crust edge for that and for a single crust pie. Make the crimping as decorative or as simple as you’d like. Cut vents in the top crust with the tip of a sharp knife, to allow steam to escape.
To finish the top crust of a double crust pie, coat the top crust with milk. Rub or use a pastry brush to spread a light coating of milk over the top of the pie. This coating creates a bit of gloss with the golden brown finish on top.
From here, bake your pie as directed depending on your pie filling. A general rule for fruit pies is 425°F for 50 minutes. Remove from the oven and cool. Cooling is important to allow fruit pies to set up so they aren’t runny when cut. Serve pie slightly warmed or room temperature.


Tips for making excellent oil pie crust
Do not chill the dough as you would a butter crust. Roll out oil crust at room temperature to ensure a flaky pie crust result.
If you find the dough is too wet, add flour one tablespoon at a time to increase the quantity of dry ingredients. Vice versa, if the dough is too dry, add more oil (instead of water) to increase the wet ingredients.
This can also be a single crust recipe, just don’t use the other half on top of the pie. Save the other half by wrapping it in plastic wrap and storing in the freezer. Or, roll the crust and shape it in a pie plate, and freeze that, ready to make a pie when you are, just add filling and bake! Or bake, then add filling if it is not a baked filling, as with cream pies.
Make Ahead and Storage
Make ahead crust works well for single-crust pies (meaning, no top crust is needed, as in cream pies and streusel topped pies). Once you roll and crimp the crust in its plate, place that in the freezer until frozen solid. This protects the edge.
Once frozen, lay a piece of wax paper over the top, then wrap the whole thing in plastic wrap and freeze.
Freeze a whole pie with double crust using the same process as above, but fill the pie and add and crimp the top crust.
To bake a single crust pie from frozen, use a pie crust protector or crimped foil around the edge of the crust to prevent the edges from burning, because the crust will need to bake longer than from room temperature dough. Be sure to prick the base of the single pie crust with a fork, or use pie weights or dry beans to hold down the crust while it bakes at 350 degrees, or until golden. Cool, then add the filling and proceed as directed for the type of pie you are making.
To bake a frozen whole pie, bake from frozen per the heating instructions for that pie, typically starting at 425°F and reducing after 15 minutes to 375°F. For frozen, each of those baking times will increase and a crust edge protector should be used so the edge doesn’t burn while the filling bakes. If the top is browning before the pie filling is fully cooked, set a piece of foil lightly over the top to prevent over-browning while baking.
Frequently Asked Questions
Both make delicious crusts. Oil crust is easier, dairy-free pie crust, and a healthier alternative, my mom and grandmother always used oil. Butter crust is great for savory pies with dense fillings (like pot pies). In any case, homemade pie crust rules!
The sky’s the limit! This oil crust recipe is perfect for your Thanksgiving pumpkin pie, coconut cream pie, apple pie, a weeknight dinner chicken pot pie, summertime fresh strawberry pie, any dessert pie, or savory recipes!
Yes, if you use coconut oil it must be liquid coconut oil. For best results and a tender crust, use my Coconut Oil Pie Crust Recipe rather than a straight substitution.
Yes, straight substitute EVOO for any of the other oils (canola, safflower, vegetable) to make an olive oil pie crust recipe. If you have some quality olive oil in your pantry, I highly recommend using it in my olive oil cake recipe!
This can be done, but it will likely affect the texture of the dough and not produce the same flaky results.
Yes, refrigerate for 3 days or freeze well-wrapped for up to 4 months. See instructions above.
Yes, the crust freezes best unbaked, well-wrapped, for up to 4 months. Bake from frozen, no need to thaw. Fill with filling before or after baking depending on your recipe.
Yes, you can bake pies from frozen that have already been baked!
Store the same way as for standard pie crust. Keep refrigerated if the filling is pudding based or should be served cold. Otherwise store the pie at room temperature for a day.
Wax paper is best here because it stands up to the moisture underneath that holds the paper in place while rolling the dough.
Oil Pie Crust, My Mom’s Best Recipe
Ingredients
For 9” double crust pie:
- 1 3/4 cups unbleached, all-purpose flour
- 1 teaspoon kosher salt, or 1/2 teaspoon table salt
- 1/2 cup plus 1 teaspoon neutral oil , such as safflower, grape seed, vegetable
- 4 tablespoons ice water
- 1 tablespoon milk, (of any sort, to top the unbaked pie to encourage browning)
For 10” double crust pie:
- 2 2/3 cup unbleached, all-purpose flour
- 1 1/2 teaspoons kosher salt, or 3/4 teaspoon table salt
- 3/4 cup plus 1-2 teaspoons neutral oil , such as safflower, grape seed, vegetable
- 5 – 6 tablespoons ice water
- 1 tablespoon milk, (of any sort, to top the unbaked pie to encourage browning)
Instructions
- In a medium bowl, whisk together the flour and salt. Add the oil, all but the extra teaspoon, and lightly stir with a metal spoon until most of the flour is incorporated and pea-sized meal forms. There will be some larger clumps of dough too.
- Add the water 1 tablespoon at a time, incorporating after each addition. The dough should be soft and pliable, not cracking and dry. Add another teaspoon of oil to get there if needed, but do not add extra water. Divide the dough in half.
- Tear off two 15” sheets of waxed paper. Wipe the work surface with a sponge dampened with cold water to keep the paper from slipping. Place one sheet of waxed paper on the damp surface lengthwise in front of you, and place half of the dough in the center of the paper. Shape the dough into a flat disk and cover with the other sheet of paper lengthwise.
- Roll the dough, starting from the center of the disk and working your way out in every direction (think of working around the clock). The dough and paper do not turn; they stay fixed. As the rolling pin moves to the outer edges of the dough, be careful not to press to hard or else the dough will get too thin at the edges. Press more in the center, less at the edges, as you roll.
- Roll the dough 2 inches larger than the pie pan, making room for the dough to slide down into the pan and still cover the rim. The crosswise edges of the waxed paper can serve as a guide at 12 inches. Roll to that edge for a 10” crust, and just inside at 11 inches for a 9” crust. If the dough is rolled beyond the waxed paper, just scrape under it with a thin, sharp knife or spatula to loosen it before picking the crust up off the counter.
- Peel off the top piece of waxed paper and discard. Place the pie plate right next to the crust. Pick up the crust with its paper and invert it over the pie plate. Move the crust to arrange it evenly over the rim of the plate. Remove the waxed paper and discard. Gently lift the edges of the crust and ease the crust into the pan. Trim the crust all the way around the rim right up against the rim. If an area is short of the rim, patch it with trimmings.
- Fill the pie with filling (usually 5-6 cups of sugared fruit with some starch like flour or cornstarch or tapioca to hold it together), then roll the second half of the dough for the top crust just as you did the bottom crust, but roll this circle slightly smaller than the bottom crust (about an inch smaller). After the top crust has been arranged over the pie, trim the crust so that there is ½-1 inch overhang of the top crust beyond the rim. Tuck that overhang under the bottom crust all around the rim. This seals the pie and prevents drips.
- Crimp the edges of the pie in a rope design: place your thumb on the pastry rim at an angle and firmly pinch the dough between thumb and bent index finger. Push down into the rim as you pinch. Make the next pinch with thumb resting against the last pinched edge.
- Cut vents decoratively in the top. Dab with fingertips or brush the entire top of the pie with milk. Cover the edges of the pie with a pie guard or pieces of foil. The foil is not a perfect science; just get it to cover as much of the edge as possible.
- Bake as directed depending on your pie filling. A general rule is 425°F for 50 minutes or so, until a fruit filling is bubbling vigorously and the crust is golden brown. Remove from the oven and cool; the filling will firm up some as the pie cools, so it's always best to bake your pies early in the day on the day they will be served. Serve lukewarm or at room temperature. The pie will keep on the kitchen counter for a couple of days, loosely covered with waxed paper or foil.
Notes
Nutrition information is automatically calculated, so should only be used as an approximation.
More Pie Recipes
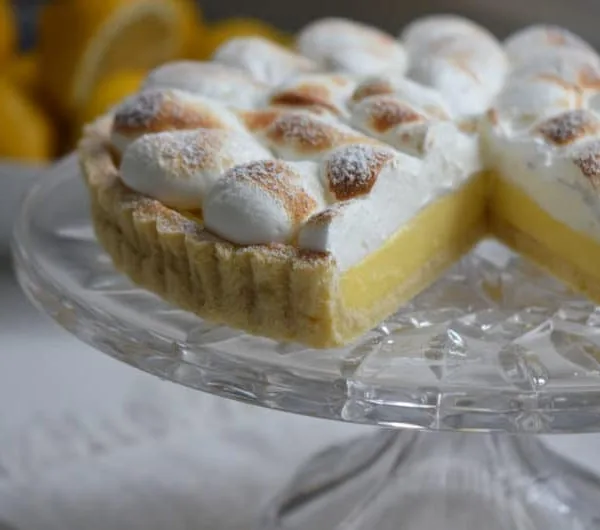
Of course, there’s a place for a butter crust! Especially with my Lemon Meringue Tart
Apple Pie with Stovetop Filling
10 Best Thanksgiving Pie Recipes


I have seen similar recipes that use water instead of milk as the liquid. How does water vs milk affect the crust differently? Does one vs the other make it more flakey, etc?
Your recipe turned out wonderfully. I love your rope crimping method.
I went looking for a low fat, low cholesterol pie crust recipe to replace my all butter pie crust. I came across Maureen’s oil crust and was skeptical but gave it a try with a fresh peach filling. It was surprisingly DELICIOUS! The crust was lighter and had a crispier consistency. I used avocado oil, and a touch less than the 1/2 cup called for, adding a little at a time until the mixture was right. This will be my new go to pie crust. Thank you Maureen.
Excellent comment Nancie, thank you so much! I love your notes here, it is indeed light and crisp. Your peach pie sounds amazing!
I made this dough today, actually 2, one for bottom crust and one for top crust. It was fast and good to work with. Baked a blueberry pie in it. I followed the recipe exactly and even bought a new bottle of oil.
When baked it smelled, well not pleasing, just weird and the taste is awful unfortunately. The pie baked nicely but the taste is just not something I wanna try again.
Sorry, but I had to share. I just wasn’t happy with it.
Maybe I’ll try coconut oil next.
Thanks Maja for your feedback. Hmmm, we just love the flavor and texture of this crust, so I’m not sure what happened here. What type of oil did you use? Do try coconut oil, it’s a lovely crust!
Wow, my son and I just used your pie crust recipe for our apple pie and it turned out so delightfully delicious!!! I used avocado oil and Thank you!
Oh great Kat! I love hearing that avocado oil worked well for you. Thank you!!
Thank you for this! This is the recipe from my ancient Betty Crocker cookbook. I’ve been trying to find it since when I transferred it to a recipe card I left out the oil measurments LOL
It makes great pie crusts but we need to STOP USING VEGETABLE OILS – coconut oil (for sweet pies) or olive oil (for savory pies) are the only good choices. I generally make mine with organic coconut oil and they are fantastic!
Please read about PUFAs and how they cause obesity & health problems. They cause your body to create a type of fat that is toxic and very hard to lose. The PUFAs stay in your body for up to 6 years after you stop eating them.
Thanks for taking the time to make a great blog and finding the recipe I needed!
Maureen, I was very excited when I found this receipt today. I made receipt for 9inch pie, dough was good
Tried a second time using using same 9inch receipt, had to use Crisco pure canola oil, she I added 1/2 cup oil became very oily a d did not become less oily it became totally oily, did not use it, I did add a tablespoon of cold water thinking maybe consistency would change,, did not I would appreciate any comments to what could have happened ,nthank you
Hi Rose, thanks for writing. I’m not sure what might have happened here, especially since your first crust with the recipe worked well. I would try weighing the ingredients; sometimes measurements can be off when using cups. Also try adding the oil slowly so you can see if you have enough at a certain point, without adding too much.
Made an oil-based crust as a test a month ago. Surprised how good it was. Question: I always blind-bake my butter crusts for pumpkin and pecan pies. Can I do the same with your oil-based crust? I appreciate your site and read it all the time. I need an answer this week, if possible.
Hi Jean, thanks so much. Yes you can blind-bake this oil crust recipe the same way you do butter crusts, pricking the base or using pie weights to keep the base of the crust from puffing up, and protecting the edges with a pie rim protector or foil.
Hello Maureen
Lately I tried few of your recipes, they worked out great. Thank you.
I have a question about your pie crust, is this a soft crust or a crispy crust?
Hi Annie, I’m so glad to hear that, thank you–this crust is flaky, so it has a crispness to it in that way.
I loved this recipe. So easy and tastes good.
I’m so glad to hear it Susan, thank you!
Thank you for your treasured recipe for pie crust.
I am glad it is flaky and am asking if you think it would work for a “hand pie”, a double crusted jam filled hand tart?
Thanks so much for your great Blog!
Sally LaRhette
Sally this crust ought to work just fine for hand pies. I have used it for large hand-pie style slices from slab pie here.
Your mom’s recipe reminds me of a pie crust that a good friend of mine thought me how to do it. Her berry pie became our Christmas tradition dessert. The main difference between the two recipes is that she replaces half of the vegetable oil with walnut oil. The subtle taste of walnut on the crust adds an extra dimension to the flavor that goes great with fruit fillings. Thank you for sharing your mom’s recipe.
Wow, I LOVE the idea of nut oils for the pie crusts. Will be trying this immediately. Thank you so much!!
Can I stuff it with chicken instead of sugared fruit?
Absolutely, this crust is excellent for pot pie!
Can we use Avocado Oil? And can we use it instead of puff pastry to stuff with meat or chicken ingredients?
Raro, I have not tested this with Avocado oil, but it’s very likely it will work well and be delicious for a savory pie.
Can this dough be made ahead and frozen prior to baking without compromising texture or flavor?
You can freeze this crust in the pie plate, after you roll it out and shape it. Then freeze just to hold it’s shape, then once the crust is frozen, wrap with plastic wrap completely (this preserves the shape of the crimping rather than wrapping before freezing). Then freeze until you’re ready to bake it on it’s own or fill and bake it. No thawing is needed.
Hi Maureen. I will be trying this recipe, too. My mother is famous for her pies, also. She uses a simple Betty Crocker recipe with Crisco, but she bakes so much love into them that everyone who tastes one eats every bite and wants more. Her pie crusts are light and crispy and if I ever am able to do as well, I will be so happy. I’m from Iowa and I totally agree that the Midwest is the greatest place to live and raise a family (except when it gets too cold).
Our mom’s were dedicated to their Betty Crocker, weren’t they?! Lucky for us!!
Where does the milk go. Did I miss it in the directions?
Gosh Rose, the recipe was missing a couple of steps (they fell off in a recent transfer, I suspect). Thank you for letting me know! The milk is a simple glaze for the top of the pie, to give it a golden shine.
Hi Maureen,
Made an apple pie today using your recipe for the crust. I still cannot believe how easy it is to make and how good it turns out. My husband loves it. For so many years, I have been searching for a perfect recipe but failed miserably. Well, those days are behind me now. Thanks to you Maureen. This will be my 40th bd present ( not until Feb anyway). I couldn’t have asked for more.
This made my day! And my mom’s! Thanks so much for sharing!
The easiest way to place the crust in the pan is after its all rolled out between the wax paper sheets is this. Peel off top wax paper, gently lay back on crust. Holding both sheets together,flip over. Peel off the top paper. Discard. Center pan upside down over crust. Slide off counter with one hand catching the crust under the pan. Flip over, remove loose wax paper. The top is trickier. But still peel both papers while on the counter, discarding the top sheet. Slide off counter onto hands and flip onto pie.
I use an oil crust for a quick topper to chicken pot pie filling I normally freeze ahead. After researching how to freeze assembled chicken potpie (this is my Christmas gift to my neighbors), I ran into your recipe. I will no longer be using my old recipe, yours provides for a very flaky delicious crust that is so easy to handle. My husband liked my experiment, he wants the last piece of pie for lunch tomorrow!
I love this for pot pie! Thank you Mary!
I made this and it was wonderful. Flaky/my Lebanese husband loves crust and he ate every last morsel and grudgingly said it was good. He told me it could be thinner next time (nobody cooks like his mother) but said your recipes come the closest to what he’s ever seen anyone call Lebanese recipes and he directed me here. 😉 I’ve been struggling w/ making crusts w/ butter these last many years ala Martha Stewart and the Barefoot Contessa but no more! I immediately recognized my own mother’s (English/Irish heritage) recipe in yours (the oil) and knew it the minute I tasted it and smelled it baking. Thank you so much.
Wonderful Maureen, thanks so much!
Thanks for this recipe! its my first pie crust and it I loved it.
Just pulled an apple pie out of the oven and it looks perfect. I pinched off a piece of crust to taste and it’s yummy! I only used 1 tsp of salt and it doesn’t taste oily at all. Perhaps leese’s oil was rancid or she used a stronger flavored oil? I used fresh canola, baked my pie at 400 for an hour, and it’s perfectly flaky and brown. I coated the top with an egg was and sugar.
My mother too made a pie crust with oil. As I remember the recipe was from a Wesson Oil cookbook. By the way, I have her cassarole that matches that pie pan.
Well I had to throw my pie out….my cherry filling came out delicious but the crust as stated above was on the salty side but even worse it tasted like oil!! I’m still tasting the oil in my mouth. I followed the directions exactly but if you really compare this recipe to others it does call for a lot of salt and oil, yuck!! Sorry the photos here look great but not the taste. Beware, if you don’t want to throw it out and waste a good filling. Feeling bummed…..
I too was on the search for a pie crust that used canola oil and came across your blog. My oh my, your pie looks so beautiful!!
I prepared the pie crust this evening for a cherry pie filling using fresh cherries. I have not tasted the pie yet as it is cooling down. However, I did cheat and nibble on the crust. Not sure if its just me but does anyone think its on the salty side? I followed the recipe exactly hmmmmm. Maybe next time I will use half the amount for the salt? I am very sensitive to salt in my food and baked recipes however I do know it adds and/or brings out the flavor.
Either way I’m sure it will be yummy!
Thanks for sharing your mom’s recipe.
After a HORRIBLE and embarrassing experience yesterday, Christmas Day, at our family get together, where my Apple Pie was an unknown disaster, until I cut into it and discovered the crust had NO taste, and the inside was watery . . . I decided to look for a “scratch” pie crust recipe, instead of the “ready made” one the recipe called for, and for a better Apple Pie recipe. Funny thing, when I took it out of the oven, the pie SMELLED devine – so much so I was tempted to cut a slice right then! Had I given in I would have avoided the embarrassment the next day. I will definitely use your recipe. If you have an absolutely great Apple Pie recipe, PLEASE let me know.
Blessings to you for sharing with everyone! Susan in Texas
Oh Susan! We have ALL been there! Here is one of my apple pie recipes–very delicious–and if you prefer double crust, just use the my Mom’s double crust recipe instead of the dutch top.
The link to the apple pie is gone. Can you email me the recipe? Thanks.
Hi Debbie! Here is the Stovetop Apple Pie Filling recipe and the Dutch Apple Pie recipe!
I have tried so many horrible versions of a canola oil crust, that I was starting to think it was hopeless. I am so glad to have found your wonderful site, and clear directions. The waxed paper trick, is an obvious one, but one I never seemed to do! Many thanks as I enter my fall of apple pie making! I am linking to your site on my own blog so I never forget this!
Hi Maureen I was looking for a crust with oil and came across your page. I just wanted to tell you how much I enjoyed reading this recipe and the story of love that accompanied it. I lost my dear mother back in 2002 and just reading about your mother reminded me of my own so much! Thank you for invoking such sweet memories! And also thank you for this recipe. I have a almost 2 year old grandson who has many food allergies. He has a life threatening peanut allergy and is also allergic to soy, wheat, and egg whites. Luckily the wheat and egg white are slight enough that he can tolerate it. But the soy which is in everything causes his to get bad skin rashes. And the peanut one scares me to death! He is HIGHLY allergic to peanuts! So now I am finding myself searching for recipes I can make for him. Sorry for rambling on, have a blessed day!
This is so nice to hear Becky. Enjoy this wonderful crust–your family is blessed to have such a thoughtful and caring cook among them!
Just made this crust (was out of butter) with a blueberry filling 🙂 It was amazing! Thanks for the recipe 🙂
So nice to hear you enjoyed it as much as we do, thank you Deanna!
While researching oil based pie crust, I came across your wonderful website. Your crust is so much like the one I use, also from my mother. The 1st photo of the crust with the wax paper next to it looks identical to my crust! I don’t use water and use a little more milk. I really appreciate how in dept you explain the process and it has inspired me to do the same when I post my recipe because with out these tips the crust could fail.
Thanks Maureen! I’m looking forward to following you site.
Cheers!
Heidi
I’ve used a similar recipe for years. I treat the mixing similar to a biscuit- to keep the crust very tender I mix it very gently, stirring as little as possible. Also I roll out the top crust before adding the filling to reduce moisture in the bottom crust. My old Joy of Cooking instructs cooking the pie at 450 for 10 minutes to set the dough then reducing the oven to 350.
Thank you Rosemary–great tips.
Hi! Would you use this crust with your Lemon Meringue Tart? I am just wondering if i could bake it in a tart shell.
I need to make a “dairy” free pie crust – but I see this recipe has milk…do you know if I can substitute water for the milk?
Thanks!
Hi Becky–the milk is just used to give the crust a shiny golden look; you can leave it out entirely and then just sprinkle the crust with granulated sugar when it comes out of the oven, or use an egg wash (egg yolk whisked with a touch of water) in place of the milk, rubbed on the crust before baking.
Can u make this pie crust (the one containing oil) and freeze whole pie. I’m not sure how oil will react to being frozen. Would appreciate a response. Thanks
Hello Linda–yes, you sure can freeze this crust–we do it often and the pie comes out great!
Your website is amazing, the food looks just like my late mother use to make. I came across your website from my cousins facebook post.He owns Adele’s restaurant in Carson City, NV. My mother maiden name
was Charlotte Abowd, which in Lebanon was spelled Abood also. Keep up the good work and recipes.
Hello to you! We are cousins; my mother is an Abowd! Thanks so much for your kind words–so good to see you here!
what a beautiful tribute to your Mum. Lovely recipe
Hi Maureen, I stumbled across your site while looking for a tool to use to clean cousa or zucchini . My mother was not of Lebanese decent , she was Italian, although she learned to cook Lebanese food from my situ, and my mother was such a wonderful cook. your site brings back wonderful memories for me, My mother made her pie crust like your mother . I will make the pie crust and think of my mother and send good thoughts to your mother. I really enjoy your site and wish you continued success. Bernadette
Maureen, you and your mother live in such a state of Grace. As always, what a beautiful column: thank you for your words, sentiments, photographs and recipes which evoke abundant memories for me.
Thank you Diane; it is a grace you share.
When I was a teenager there appeared in my dad’s grocery store a box that contained what you needed to make an apple pie. Flour, dehydrated apples, a cinnamon tablet and I forget what else. You had to soak the apples and add the cinnamon tablet, etc. The crust of course was more difficult, I recall a bit of patching here and there. I tried it once, twice, three times, it got better but was never a “real” apple pie. It made good small talk though at lunch time with the girls in the high school home-ec class, they couldn’t believe I made an apple pie. I don’t recall if I told them about the kit that came in a box or not! A genuine, true, Lebanese story. 🙂
What a great story Jerry!
MMMMMMM! I’ve just resolved to use your mother’s recipe to make pie this summer when I will have the time to do it right. Thanks for the irresistible inspiration in words and images.
Well sir, I never took you for a pie baker. You never cease to surprise. Let me know about that pie this summer!
The food you make and the blog posts you write are wonderful because they are like you, Maureen. Complex, beautiful, and full of heart. You come through in every image and word.
How dear and kind and wonderful Sofia. Thank you.
I can’t wait for the fruit to come into season and put them into this pie crust.
This is splendid. I love this on multiple levels — the topics of piecrust, home baking, and dependable recipes; the personal stories that bring it home, the photographs especially of the book, and the instructive ones on What Exactly To Do all the way through; the information on the general topic and this specific one…It has layers, just like the marvelous piecrust which I am going to make today. I love your posts and should say so way more often….
Nancie, I’m touched. Those generous words mean so much coming from you! Thank you thank you.
Oh, this sounds and looks so good Maureen! Complimenti!